Friday, September 28, 2012

Quilt Along with Leah Day - Week 33


Pointy Paisley (Pivoting Triangles)
It's a miracle. Not only did I manage to finish Leah's assignment for Week 33 just one day after it was posted, I also am writing my post about it the following day. Normally it takes me four days from Leah's posting to get my assignment done and publish my own piece. It feels quite good to be so far ahead of schedule. Perhaps I am getting faster with practice. I suspect it is because I have an incentive. I am using many of the recent practice pieces, including this one, in the background of the current art quilt I am working.

Detail from Pointy Paisley (Pivoting Triangles)
It can be difficult to see the stitches on my full view pieces. That is why I always include a close up. However, if you click on any image on the page, you are able to scroll through the images at their actual size (versus blog size) and the stitches are easier to spot.

Backside of Pointy Paisley (Pivoting Triangles)

Leah refers to this week's pattern as Pointy Paisley, but I prefer to think of it as Pivoting Triangles. The idea is to start with a triangle, echo it a few times and then pivot off in a new direction and create the next triangle. The big difference between this pattern and the others in the Paisley family cluster is that the lines are straight.

Detail of Backside of Pointy Paisley (Pivoting Triangles)

I had to do a bit more travel stitching with this pattern, as well as "filler" spaces. You can see this clearly on the backside of the piece. Those aren't hesitation beads at the points, they are thread building up by returning to the same point over and over again.

When I first saw Pointy Paisley, it didn't grab me as a pattern. However, once I finished my practice panel it had grown on me.

Tuesday, September 25, 2012

Quilting Along with Leah Day - Week 32


Snake Paisley 

Leah Day gave us another permutation on a pivoting paisley to practice this week. At first I couldn't tell the difference between Snake Paisley and the prior week's Lava Paisley. The difference is very subtle and has to do with the original shape that is echoed. Lave Paisley has one sharp point and one rounded end, where as Snake Paisley has two sharp points.

Close up of Snake Paisley
Whether the ends are sharp or rounded, the overall effect is pretty much the same. I also found them just as easy to execute.

I chose this very pale batik to practice on. I will be using it in the sky portion of an abstract quilt I am working on with a working title of Out on a Limb. It could just as easily be used for water, since the Snake Paisley design looks like a lake stirred up by a gentle breeze.

Monday, September 24, 2012

Auditioning Patterns III


The Seagulls Throw a Beach Party
65" H x 47" W
The Seagulls Throw a Beach Party is done! I will ship it this week to grace my grand niece's nursery. She was born September 12, 2012. She and her mom, my niece, are both doing well.

This was the quilt that I auditioned various patterns for the border. I was concerned that my decision to go with the scallop motif, emphasized by a surround of mini stippling would be far too time consuming. Leah Day encouraged me to go for it, stating that once the scallops were set the stippling would flow rapidly and smoothly. She was absolutely right. The big time consumer was stitching the scallops and removing the Solvy. Once the scallops were in place all that practice doing stippling made for smooth sailing.

Detail Showing the Border
from
The Seagulls Throw a Beach Party

Monday, September 17, 2012

Quilting Along with Leah Day - Week 31


Front Side of Lava Paisley


Is this gorgeous fabric, or what? I just love vegetation, batiks and chartreuse, so couldn't resist buying this gem when I say it. I used a variegated King Tut thread of a similar color way that blended beautifully with the fabric but makes it very difficult to pick out the quilting on the front side. The downside is that I occasionally crossed over a stitch line because I just didn't see it. The upside is that if you don't know where the crossovers are you can't find them.


Backside of Lava Paisley


This is the second in Leah Day's series based on echoing and pivoting paisleys. She titled this Lava Paisley, her husband had another, much funnier name and I have christened it Wiggling Paisley. I'm not sure whether it was executing Pivoting Paisley or allowing the paisley to develop from a wiggling tear, but I found this much easier to stitch than last week's exercise. I also prefer the overall look.

The Detail Allows You to See the Stitching


Although Leah suggests that there is a fair amount of traveling stitching with this pattern, I actually found the travel stitching minimal. It is most noticeable on the back side.


Back Side Detail Shows Some Travel Stitching
and Filler Work


Sunday, September 9, 2012

Quilting Along with Leah Day - Week 30

Good-bye stippling. Hello paisley patterns. Our first assignment in the pivoting paisley family could be described as echoing a tear drop. I am used to paisleys looking more like either Yin or Yang. This pattern doesn't curl or have a tail.


Full View of Pivoting Paisley - Mid Scale

Working on a new to me pattern is a humbling experience. This was particularly difficult because I opted to follow Leah's lead and try to execute the pattern in a larger scale than my usual small scale style. I did fine with the inner tears but when I tried to echo them 1/2" or so out I really struggled to keep swooping lines. By the time I reached the outer echo my lines tended to undulate instead.

Detail of Pivoting Paisley - Includes Travel Stitching
and Filler Lines for Odd Gaps

How do you do it, Leah? How do you keep your echo lines so evenly spaced with such perfect arcs and swoops? I can imagine that practice is beneficial, but do you have any other tips for large, even very large free motion quilting?

Sunday, September 2, 2012

Quilt Along with Leah Day - Week 29

Front Side of Adding Shapes 
Back Side of Adding Shapes
Remember you can CLICK on this
or any image TO view it
ENLARGED.


When my children were in primary school (they are now 28 and 32 with children of their own) the school they attended taught in a way that was referred to as spiral learning. The concept is a subject begins at a basic level, and returns to the basic level time and time again, but each time it returns it is expanded upon. This helps cement early concepts while allowing for growth. That is exactly how Leah's assignments work.

Stippling with Heart Inserts

Our very first assignment was to try our hand at stippling. We have returned to stippling and four of its cousins, sharp stippling, zippling, circuit board and loopy multiple times over the course of 29 assignments. This time we were to incorporate a shape periodically while stippling, sharp stippling, zippling, creating circuit boards and going loopy. Leah recommended that we try adding hearts, but she also pointed out that other shapes could work just as well. Sounded like a challenge to me!


Sharp Stippling with Daisies

Triangles Become a Design Element in Circuit Board

The curved nine patch block I had been saving for a future Leah assignment was just right for this week. I decided to do stippling with hearts inserted into the design in the outer corners and center block. Sharp stippling suggested daisy petals to me, so thats what I did. I matched triangles with circuit board and an element I dubbed Greek Spirals with zippling. Finally, I inserted some leaves into my loopy block.

Zippling Gets Pizzaz with Greek Spirals

Loopy is Transformed to a Vine with Leaves

One of the great things about revisiting the basics of a subject, such as free motion quilting, is just how much more intuitive it becomes. I was able to do 100% of the assignment without ever quilting myself into a corner or needing to break thread. There isn't one hesitation bead or tension loop on the reverse side. Sure I could quibble or obsess about a heart that wasn't completely closed a straight line or angle that curved here or there, but I won't. I have confidence that these little bobbles will work themselves out too with practice.

Saturday, September 1, 2012

Following Along with Leah Day - Week 28 - Auditioning Patterns II

Auditioning Pattern and Thread Choices on the Actual Fabric
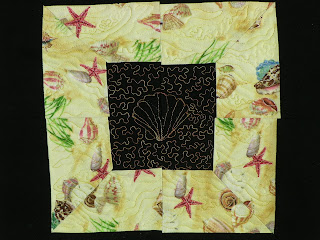
In my last post I auditioned three different free motion quilting patterns for the border of the quilt I am making for my grandniece. The one that looked best on paper to me and to most of you who commented was the one with a scallop shell motif surrounded by micro stippling.  Before I committed to doing it on the actual quilt, I wanted to test my marking technique and thread choices on a block I created from the border scraps.

I traced the scallop shell on a square of Solvy. Next I pinned the Solvy square on the quilt. Then I sewed on the tracing, tore away the Solvy and surrounded the stitched scallop with micro stippling.

The thread choice for the beach fabric was easy. It is a Marathon yellow, beige and white variegated that I used in the main section of the quilt. The tricky choice was which thread to use for the black border. The obvious choice was black. My muse said obvious, but wrong. If not black, then what? I perused my thread collection. When I saw the brown, rusty with hints of red and yellow King Tut variegated it called to me. I am pleased with how it ties the beach fabric with the black fabric and allows the scallop to stand out.