Sunday, April 29, 2012

You Are Invited...

Detail from Color Guard by Gwyned Trefethen

I am blessed to live on Little Lake Butte des Morts in Appleton, WI. My studio overlooks the lake. It is a delight in all seasons and right now I am loving spring. This week the pelicans returned. Little Lake Butte des Morts is on several migratory bird routes. So, not only do I get to see our native birds, but I also see many non native species that cruise through for a day or more to rest up along their migratory journey.

Heron on a Stump by Kathie Briggs

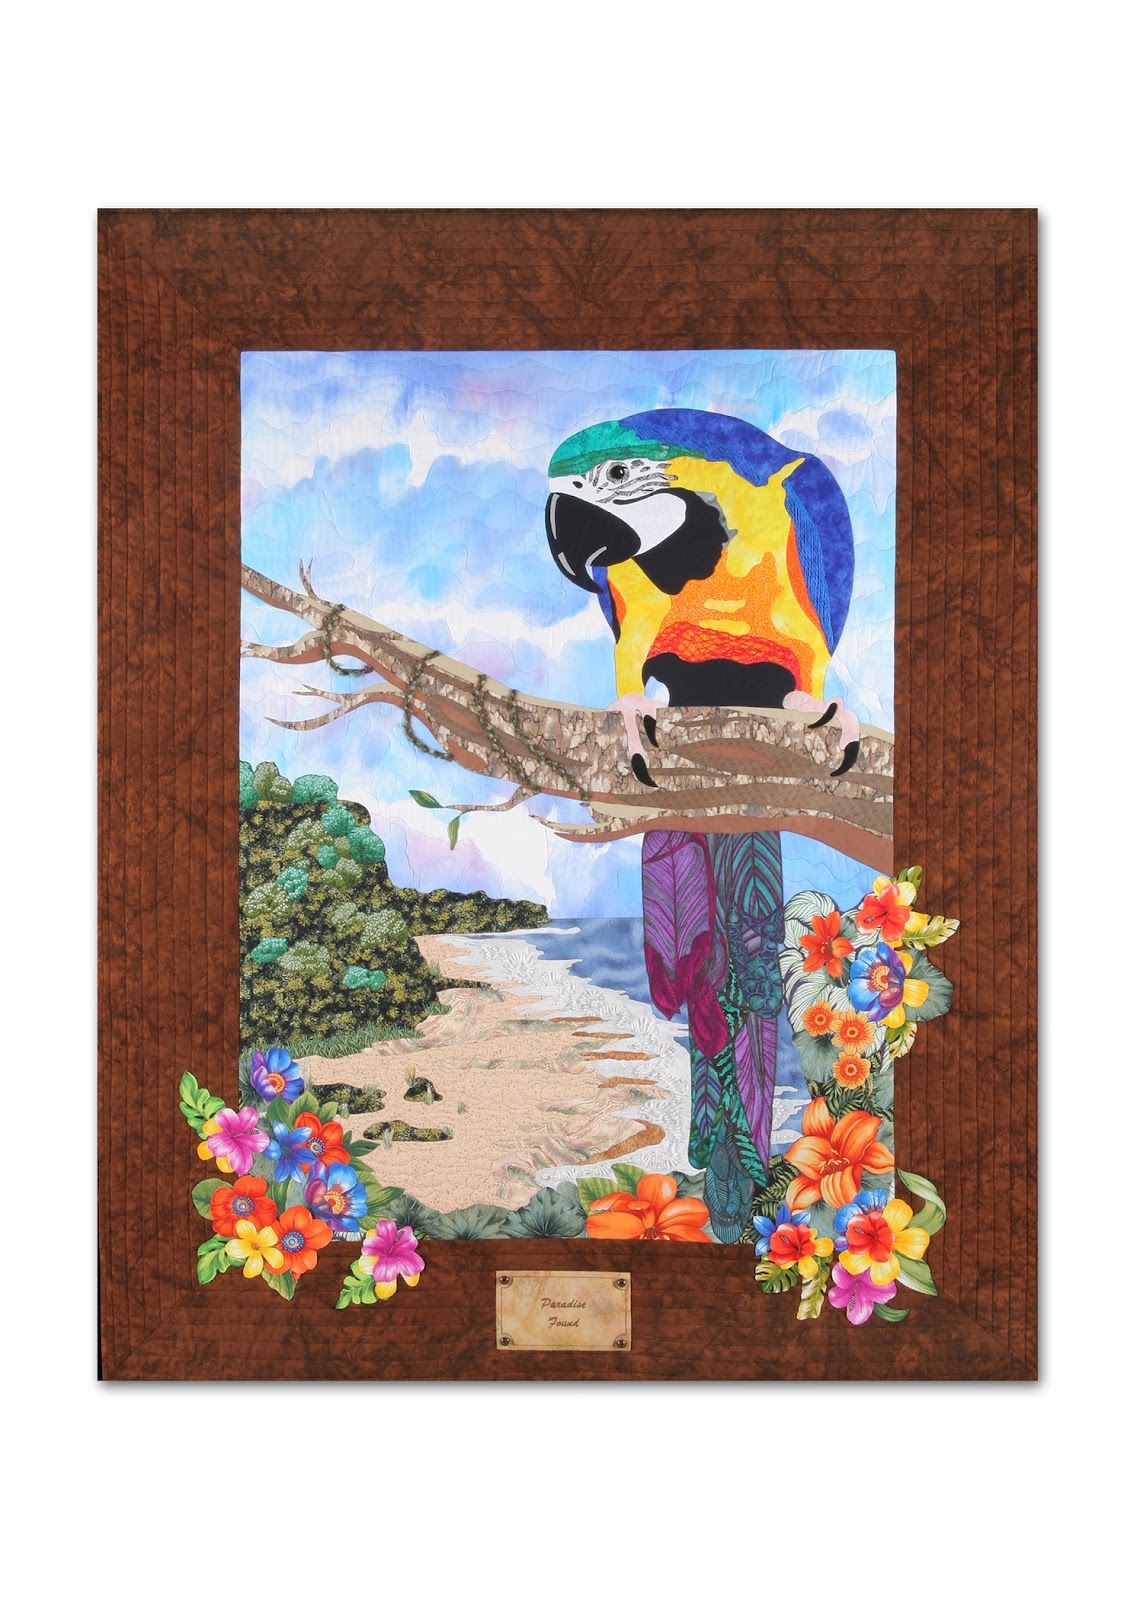
Paradise Found by Casey Puetz


You, too, can observe the birds while getting a fiber fix. You are invited to join me at the Artist's Reception, on Saturday, May 5, 2012 from 1 - 3 p.m. at the Mosquito Hill Nature Center in New London, WI. The exhibition is titled Conversations in Stitch: On Nature. All the work on exhibit is made by members of the Fiber Artists Coalition of which I am a member. I also curated the exhibition. If you can't make the reception due to a conflict other than distance why not schedule a date to take a walk and see the exhibit while it is there from Saturday, May 5 - Sunday, June 24, 2012.

Sunday, April 22, 2012

Quilt Along With Leah Day - Week 15


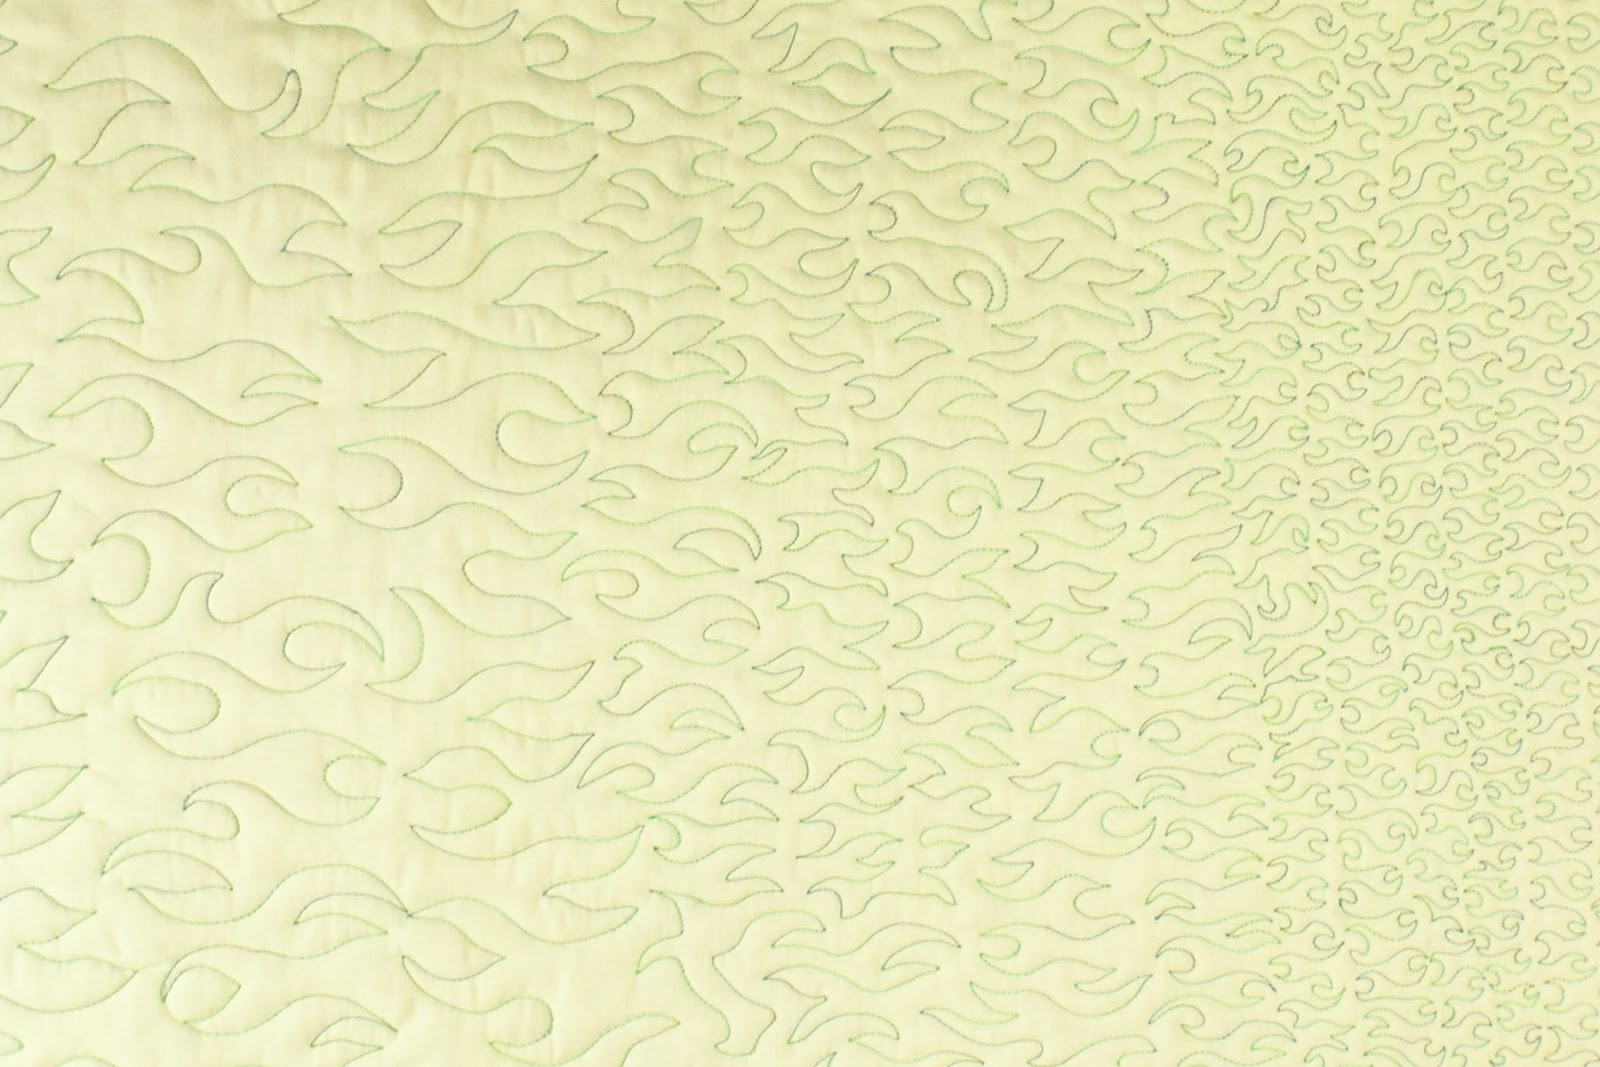
Sharp Stippling - Gradated from Large to Small

Leah put us back to work this week. She titled this form of all over design, Sharp Stippling. The primary difference between Sharp Stippling and stippling is that the Sharp Stippling design results in sharp points versus an all over gentle curve. The design reminded me of either wrenches or whales tails and it could be morphed to look like a jester's cap.

Starting with Single Points

In order to develop a comfort level with the design Leah recommended that we start with its simplest elements the peaks and valleys, eventually dividing the peaks into two peaks and then interlocking the rows. The challenge, Leah said, and I paraphrase, "is to avoid hesitating at the points and therefore creating beads of thread building up on the back of the quilt." It surprised me that this wasn't my biggest challenge. In fact I had very few hesitation beads relative to the number of points.


The Backside - Note Occasional Hesitation Points

My personal challenge was not getting twisted in the pattern. It looked simple enough. It wasn't the points where I got lost, but instead I struggled to remember the appropriate S shape between the upper and lower points and in my panic would veer even further off course.

Getting Lost in the Pattern

I began large. Very large. Then I worked my way through several midsize sections, ultimately finishing with eight or so rows of small repetitions of the design. I rather like the large flame like section from an appearance state, but I preferred working in the midsize to small range. This could be because the more I practiced, the more proficient I became with the design. However, I think that is only half the story. I find it easier to manipulate the quilt in a small area than to go tearing off for 2" - 3" at a time.

Wednesday, April 18, 2012

Gwyned's Paper Piecing Tutorial

Leah is giving us a week off to practice what we have learned about free motion quilting on a UFO. You may recall I don't have any UFO's. I thought I might I try my hand at free form curve piecing some small quilts to practice on. It soon became clear that that genius idea was going to be far to time consuming if I was I also going to stay on schedule for the quilt I am currently working on. So, instead, I have opted to share Gwyned's Paper Piecing Tutorial.


Entwined
by Gwyned Trefethen
64"H x 48" W
Paper Pieced

I have had a love hate relationship with paper piecing ever since I first gave it a go over 15 years ago. What I hate about it is:

  1. Getting the fabric scraps the right size;
  2. Orienting the scraps correctly so there is sufficient seam allowance;
  3. Avoiding fabrics with obvious direction; and
  4. Removing all those scraps of paper after everything has been seamed together.
What I love about paper piecing:

  1. The precision;
  2. The ability to piece together atypical angles; 
  3. It suits my hyper organized personality; and
  4. The precision.
It is the precision that has me coming back again and again. What can I say? I get a thrill out of seeing all those crisp, sharp points and precise, complex "Y" seams come together so nicely. Just like free motion machine quilting, paper piecing requires practice and more practice, coupled with experimentation to work out a system that works for you. This is what works for me. It isn't the right way, just my way.

I am currently working on quilt that has four paper pieced blocks and I am making each of them five times. When I make multiple blocks that are all colored and pieced the same way I piece them simultaneously. In other words I seam piece 1 and piece 2 together for Block A five times. By repeating what I have just sewn I avoid forgetting how to do it.


Freezer Paper Tracing Layered on Top of Paper Piecing Foundation

I begin by hand tracing the paper pieced block pattern for the block on freezer paper. I note the Block (in this case Block C)  the segment of the block, the fabric to be cut and the number representing the order that it will be pieced in each piece. In other words piece C1 - 1 - b means that this piece is the first piece in segment 1 of Block C and the b stands for the "b"lue background fabric.


Freezer Paper Templates Laid Out and Ironed to the WRONG Side of Fabric 

The next step is to cut apart the freezer paper block and divide the paper pieces into piles by fabric. This means I set all the pieces that are to be cut from the blue background fabric in one pile, those that are to be cut from the white batik in another, etc.

Since I am making five of these blocks I save time by layering five pieces of the blue background fabric,  laying out all the freezer paper templates that are to be used to cut pieces from the blue background fabric on the top layer and then adhering the freezer paper templates to the top layer by ironing them place. It is VERY IMPORTANT to be sure that when you lay out the freezer paper templates you leave sufficient room for the seam allowance between adjacent pieces. My rule of thumb is leave between 3/4" - 1" channel between pieces. ALSO the freezer paper is ironed to the WRONG SIDE of the fabric.

The advantages of cutting your fabric in advance this way is that helps insure that there will be sufficient fabric for each piece. Pieces are such odd shapes in paper piecing compared to traditional piecing that it is easy to short change yourself.


Cut the Pieces Apart

Once all the freezer paper templates are ironed in place it is time to cut out the pieces. This is not the time to trim exactly. The goal is to have at least a 1/4" seam allowance surrounding each piece, but more is always better.


Be Sure to Leave a Generous Seam Allowance

Now that all of the pieces have been cut, I organize the pieces by segments. Note, I only work on one block pattern at a time. Block C has four segments. So, there are four segment piles of pieces. Each pile is in numerical order by piece with the five Piece 1s at the top and the last stack of pieces to be pieced at the bottom. I know which pile is which, because I top each pile with the paper piecing segment pattern I will be using as the foundation.


Piles of Cut Fabric Organized by Segment and Order Sewn

Next I take Pieces 1 and Pieces 2 and using the segment foundation pattern determine which sides will be seamed together. I trim the seam allowance to be exactly 1/4". The picture shows how these two pieces "match up."


Alignment of Piece 1 and Piece 2

I go one step further and I snip registration marks at the beginning and ending of the seam. This way when I flip the pieces right sides to right sides I have the marks to orient the two pieces together and to orient the pieces to foundation line. HINT - hold the paper foundation up to the light in order to see where to place the pieces.


N.B. The Registration Snips!

Now I sew along the first seam line using smaller than normal stitches. The more times you perforate the paper the pattern the easier it is to remove at the end. However, you want to avoid perforating it so many times that the foundation falls apart before you are ready. On my Bernina a stitch length of 1.5 to 1.75 seems to be right.


Align Index Card with Seam Line


Then Fold! 


I am not sure where I picked up this trick, perhaps Carol Doak, but I find it helpful to fold my paper foundation over an index card versus just folding it at the next seam line. Then I trim that seam allowance to 1/4". However, when I am paper piecing itty bitty pieces I use 1/8" as my seam allowance.


Ruler Alignment Used to Create 1/4" Seam Allowance

Drop back in a couple of months and I will unveil what I was making to create this tutorial. For now it must remain top secret. Otherwise, I would have shared a bit more - such as photo of the completed block. Any guesses what I am making?

Saturday, April 7, 2012

Quilt Along With Leah Day - Week 13

Finished! It isn't a quilt until it is squared up and bound. Actually, if I was creating one of my own artworks versus completing a Leah Day assignment, it wouldn't be finished until the label and sleeve were sewn on, it was photographed and it had its own page on my website. Truth be told, I don't consider a Leah Day assignment complete until I share my experience with you.

Hearts and Feathers - Finished!
This was humble pie week. Leah reminded us to "measure twice and cut once." This is an adage that I have followed for years and did for this assignment. However, I would like to add the codicil to review the assignment, even a keep a copy on hand in the studio, before executing the assignment. The goal for this assignment was straightforward - rinse the quilt to remove the marking pen and starch, block the quilt and then bind it. But wait, before immersing it in the water I was to measure the quilt to know what to block it to. Oops! I squared up the quilt by laying it flat on my piece of styrofoam board and using the center point of the corner hearts as end points of my square up lines. Looked good enough when it dried.

In order to trim the quilt I used those same four corners and the intersection of the central hearts to lay my ruler in an X formation. (One line at a time.) I differed from Leah here. I always square my work on the diagonal. I extended the line beyond the hearts so that I would have a border of micro stippling. 22" on the diagonal worked for me. I made a small dot at the official four corners. Next I trimmed the quilt.

Now it was time to make the binding. I always make bias binding using the Mobius strip method. Why? Two reasons. First bias binding is more giving than straight of the grain. Second, and this is the most important reason, it wears much better. If a thread gets nicked or pulled on the edge of a binding the pulled thread would run the length of the binding strip if it is cut on the straight of the grain. If it is bias binding it will only result in a short tear. I usually make double fold bias binding and use a 2" strip. This results 1/2" of binding showing on the front of the quilt. Leah recommended just folding the strip in half. I wanted a smaller width for my binding since this is a small quilt. I dropped the width of my strip 1 1/2". Double oops. I didn't do the math and this left me with a vary narrow binding. A folded binding works differently than a double fold binding. Who knew?

Close-up of Hearts and Feathers Binding

I soldiered on. Got that mini binding sewn to the back, folded to the front and found I didn't need to pin it quite as obsessively as Leah recommended. I just went slowly and used the index finger of my right hand to hold down the binding between pins, gently pushing the binding towards the inside of the quilt.

Next problem was using the recommended foot for my machine to create the button stitch. The foot was great for staying lined up with the binding. It lost major points for seeing where the stitch was. Therefore, there are some wobbles that when the quilt is reviewed by the quilt police would be obvious.

What I learned this time? The same lesson I seem destined to learn over and over again. Don't rush through a project just to finish it. Each oops was a reminder of how just a simple double check would have saved much angst.


Sunday, April 1, 2012

Quilting Along With Leah - Week 12

I left you and my Hearts and Feathers whole cloth piece hanging by a thread last week. Hearts and Feathers is still not finished, at least in the formal, bound and blocked sense, but all the quilting is done. Boy, I am I glad I opted to follow my instincts and work from the center out, doing the micro stippling as I came to it. Why? Because it took me another 5 hours of creating the outer ring half of the feathers and the micro stippling that surrounds the feathers. I also, never had to break my thread from stop to finish. I did need to bury a few ends, but that was only because I needed to start a new bobbin 3/4 of the way through the project.

Front of Hearts and Feathers
Back of Hearts and Feathers
Speaking of thread, I opted to give a new brand a try. I used a 40 wt. variegated rayon thread by Marathon. I was introduced to this thread by fellow Fiber Revolution member, Barbara McKie. Barb is known for her outstanding thread painted imagery. She loves the strength and sheen of this thread. I've been looking to add more sheen to my own work. Hearts and Feathers seemed liked the perfect project to test drive this thread. As Leah advised, I used the same thread in my bobbin that I did on top. Micro stippling with its numerous tight curves requires a high level of tensile strength. My thread never shredded or broke once during the whole project.

Detail of the Back of Hearts and Feathers

Confession, my micro stippling might be more accurately described as mini stippling. Leah achieves a 1/16 of an inch channel throughout her stippling. I find 1/8 of an inch my threshold. Fortunately, that is small enough to make a sufficient distinction between the hearts and feathers and the background.

Another Detail of Hearts and Feathers

By using a pale batik for the front of my quilt and muslin to back the quilt I was able to see the difference a solid, versus subtly patterned fabric makes when creating a whole cloth quilt. It could be because I selected a variegated thread that merged nicely with the batik that I ended up preferring my back to the front. I just like having a bit of contrast between the background and foreground. Also, I think the muslin allowed the sheen of the rayon thread to be shown to its best advantage.

Detail from the front of Hearts and Feathers. Note the blue marking pen.

Imagine - a back that beats the front! That is the miracle of growth that I have achieved by quilting along with Leah. In the past my back would have had its share of hesitation knots and snarls.

Next week Leah plans to share with us how she blocks and finishes her quilts. I'm always looking for good finishing tips. Can't wait!

Sunday, March 25, 2012

Quilting Along With Leah Day - Week 9, 10 and 11!

It is time to catch up with what has been going on with my determination to Quilt Along With Leah Day. Leah needed to take some time off to cope with one of those bugs that has a nasty habit of running the course of a family. Her time off coincided with my own need to focus on family. This had me taking 10 days to travel back to Massachusetts, where the majority of my family resides.

Don't forget you can click on any image to see its enlarged version!

This is my mother's favorite quilt of mine. I am rather proud of it, too. I was blown away when I discovered that it was selected for the title page of "500 Art Quilts" published in 2010 by Lark Publishing.

The primary reason for the journey when planned was to spend a final visit with my mother, whose health had been declining for many years and to host a baby shower for my daughter-in-law, whose first child and my first granddaughter is due at the end of May. It was always uncertain whether I would make it back east, before my mother passed. She died two days before I arrived. Although I missed the opportunity to say good-bye in person, I had been speaking to her daily for over six months. I began my visit organizing the memorial service, spent the majority of the visit emptying her independent living apartment and finished with the baby shower and my third grandson's first birthday party in Connecticut.


Tropical Reef Quilt - a detail from the quilt for Mikayla, my first granddaughter

If you followed Leah's 365 quilt designs Blog than you will recognize the kelp I quilted in the border of the Tropical Reef Quilt I gave as my present at the baby shower. I wrote more about this quilt on my blog.

I debated whether to share this experience so publicly, but ultimately decided that everyone experiences major life transitions and knowing when to let go and when to return to quilting and just how sustaining quilting can be during the tough times is worth writing about. I purposefully chose to do Quilt Along With Leah during this tumultuous times because I knew letting someone else provide the assignments and guide me through the weeks would be vital for me to feel connected to the quilting world. It has been. Thank you, Leah and to everyone else who has taken the time to read my musings and leave comments.

I'm back! It feels so good to have regular, uninterrupted time in my studio again. One of the first things I did is catch up with all Leah has written since my absence. I have even started my whole cloth quilt. I skipped over Lesson 9, which was to continue to FMQ on our own. I do that naturally in my artwork. Lesson 10 was to mark a design, generously provided by Leah, on starched fabric and baste the quilt sandwich ready to go for Lesson 11.

As many of my fellow quilters discovered photographing barely visible markings can be a task in futility. I didn't even attempt it. I used a Mark B Gone pen as my marking tool. I probably should have bought a new one. What I ended up doing is going over the fainter marks multiple times until they were less faint. I don't own a light box, but have always used glass sliding doors on a sunny day as my light box alternative.


Note the home made "Pinmoors" compliments of my husband's ingenuity


Leah has been promoting Pinmoors as her current favorite basting tool. I didn't want to invest in yet another quilting tool without giving it a try. Fortunately, my husband is great at working out home made solutions. I showed him the Pinmoor site and Leah using Pinmoors and asked if he could provide me with a test product. He did. His company has what are basically long "ropes" of styrofoam like material approximately 3/8" in diameter that would end up in the trash if he hadn't rescued a length for me. The rope is easily cut into "corks" to cap long straight pins. I was concerned that the lumpy look of the basting would create two problems. First, that the layers of the quilt sandwich wouldn't start or stay alined. They never shifted! Second, that I would find positioning my hands on the fabrics over the all the "corks" awkward and intrusive while FMQ. I am left feeling neutral about that. I'm still partial to my Wonder Under light weight fusible method, BUT if you are using Mark B Gone and can't iron the quilt, the Wonder Under method is off the table, so it is nice to have Pinmoors as an alternative basting method.


Close-up of the double heart motif


Leah recommended starching the top and backing before copying the design on to the fabric. I have avoided starch for years. Since I make art quilts from a variety of fabrics and can't afford any shrinkage of batting, even though I preshrink my batting, I don't soak my quilts after making them. I also don't mark them. :). Whole cloth quilts require soaking to remove the marks and the starch. This project is all about experimenting and trying new ideas, so I starched my fabric. I was pleasantly surprised how smooth the fabric became and stayed after ironing. I also enjoyed the lovely thwack, thwack, thwack of the needle going through the taut fabric as I sewed.


Note the blue marking line AND that I only did the inner half of the feather vine.

Once again I couldn't help myself and rebelled slightly. During Leah's demo she mentioned that she would normally do the micro stippling inside the central heart motif while she was outlining the hearts. You can see that is precisely what I did. That way I did one continuous line of quilting and could have continued without ever breaking the thread for the rest of the quilt, if I had just thought about my transitions a bit more. As it is I did the next round of quilting (hearts in each corner, inner half of the feathers and micro stippling in the hearts and between the feathers and the central motif) as one continuous line of quilting! I really enjoyed alternating my style of quilting from following a line to micro stippling. I actually found this project so relaxing that I am imagining a series of whole cloth quilts, just not using traditional motifs.

Monday, March 19, 2012

It's A Girl!

I've been sitting on a secret that I have been very eager to share for months now. My daughter, Miranda, has three sons, making me the grandmother of three grandsons, Matthew, Benjamin and Andrew. Aren't they adorable?


My daughter-in-law, Kylee is due to deliver my first granddaughter on May 26. What does a quilting grandmother do while she waits? Make a quilt, of course. 

TIP: Click on an image to view it in an enlarged format


When selecting the perfect quilt for the nursery I like to think about the parent's interests and what they will be sharing with their child as she grows up. Both my son and daughter-in-law love to go snorkeling amidst the tropical fish. 


They met on swim team when they were eleven and twelve years old. The mascot of the team was a fish. My son was on the local town team called the Snappers with a logo of a turtle. 

Hence the tropical reef motif featuring a turtle. Imagine my delight, when I learned half way through making this quilt that the theme for the nursery is sand dollars and starfish! Note the starfish nestled in amongst the coral.


Leah Day has heavily influenced the quilting patterns I used. Whenever I am stuck for a filler design I go to Leah's site and browse through her 365 options. I will also just let my imagination guide me, sometimes following hints in the fabric, other times, the shape of the piece or a doodle that makes sense for item being quilted, such as a spiral on the back of a turtle's shell or the sense of a current in the ocean.

Why the big secret? I was waiting to surprise Kylee with the quilt at her baby shower. The shower and the quilt were a huge success!

The pattern, heavily tweaked by me, is called Fantasy Fish and is available from LAM Designs.