Thank you for following my blog. I hope you will continue to follow it, now that it has moved from Blogger to WordPress.
Instructions for how to follow my WordPress blog depends on how your device displays the post:
If the Comments Section appears at the end of the post:
1) Scan to the bottom of the current Wordpress post until you come to the comments section.
2) You need to enter a comment when signing up. Feel free to say "follower".
3) After you have typed in your comment, just below the comments you will see two options. The first allows you to be notified if there are additional comments and replies after you. There is no need to check this UNLESS you want to see my replies or what other people have to say. The second checkbox will make you a follower of Gwyned Trefethen's Musing, by notifying you whenever I post something new.
If Comments appears on the left side tool bar:
1) Click on Comments
2) Follow instructions 1 - 3 from up above
You can find my Wordpress posts from now on at:

Friday, March 22, 2019
Friday, March 15, 2019
Week in Review 2019 - 03/15
Thank you for following my blog. I hope you will continue to follow it, now that it has moved from Blogger to WordPress. In order to follow my WordPress blog, scan to the bottom of the current Wordpress post until you come to the comments section. Just below the comments you will see two options. The first allows you to be notified and view comments. The second will make you a follower of Gwyned Trefethen's Musing, by notifying you whenever I post something new. You can find my Wordpress posts from now on at:
Friday, March 8, 2019
Week in Review 2019 - 03/08
Thank you for following my blog. I hope you will continue to follow it, now that it has moved from Blogger to WordPress. The inaugural post is today. You can find my posts from now on at:
Friday, February 22, 2019
Week in Review 2019 - 02/22
 |
| Cohasset Sunrise Note how dramatically the values change around the perimeter of the piece. |
You may recall Cohasset Sunrise from several weeks back. I interrupted my finishing work on it, while I attended to various challenge deadlines I wanted to meet. Deadlines met, it was time to begin finishing Cohasset Sunrise. There are many ways to finish the outer rim of a quilt. Most fall into two general categories, binding and facing. The difference between the two is that binding acts like a frame of the work it surrounds, whereas facing turns the raw edge to the back of the quilt, covering it in the facing. When to choose one over the other is a matter of aesthetics. In the case of Cohasset Sunrise, I have opted for binding.
 |
| If you look closely you can see how I change the binding fabric dependent on its location on the quilt. Cohasset Sunrise required 300" of bias binding. I used five different fabrics to make the necessary binding. |
 |
| Although it isn't necessary, this bias binding tool makes placing the bias binding folds so easy. |
My favorite method of making my own binding is to use the continuous bias strip method. The trick for me is figuring out how much binding I will need, and how much fabric is required based on my need. This is relatively easy to do when you have a length of fabric, since the equation is readily available. But what if I have lots of odd rectangles, say a 9" x 15" piece of one fabric and a 12" x 19" of another. How do I calculate how much binding I can get from each. I couldn't find a formula on the internet for that equation and was struggling to come up with one on my own. My husband to the rescue. Here is the equation should you ever be in the same bind (pun intended).
L (length of fabric) divided by WB (width of binding strip) round down to nearest whole integer x W (width of fabric) = LB (length of binding).
If you have a 9" x 15" piece of fabric and your binding strip is 2" wide you plug into the formula this way:
9/2 = 4.5
4 x 15 = 60
Therefore, you get 60" of binding from a 9" x 15" piece of fabric.
I am linking up with Nina Marie's Off the Wall Fridays.
Friday, February 15, 2019
Week in Review 2019 - 02/15
 |
| Detail from Finding True North Clicking on the image should provide an enlarged image. |
 |
| Finding True North 24" H x 18" W |
This is a shout out to my brother, who follows my blog. Nick pointed out I had used the wrong word to describe the trails of geese last week. I was thinking of contrails. However, when writing this piece I opted to see if there was a word for what I was trying to say. Turns out there are three: team, trail, and skein. I love the idea of a skein of geese, as I am also a knitter, so skein of geese it is. Thanks, Nick.
I am linking up with Nina Marie's Off the Wall Fridays.
Friday, February 8, 2019
Week in Review 2019 - 02/08
 |
| Finding True North 24"H x 18" W January/February 2019 Art Quilt Challenge |
With 30 years of making artwork I have learned what I enjoy making and what just isn't worth it. Perfection, for example, is never my aim. I do enjoy refining and hopefully, improving and/or learning from each piece I make.
The basic piecing of the geese entrails and quarter sun of Finding True North, was relatively easy since these could be paper pieced. What wasn't easy, and what I have zero patience for, was working out how to piece the entrails into the background. So, I didn't. Instead I turned under the seam allowance and attached them to the background with a blind hem stitch. No hair tearing or perfection required.
 |
| Finding True North - detail |
FindingTrue North isn't done yet. I'm looking forward to the next phase, free motion quilting. I'm also contemplating helping the geese pop just a bit more. That will have to wait until next week.
I am linking up with Nina Marie's Off the Wall Fridays.
Friday, February 1, 2019
Week in Review 2019 - 02/01
 |
| Page 20 from the January 2019 issue of Audubon |
 |
| Finding True North Roughed out design using EQ8 Actual coloring will be different and the central sun ray will be visible in its entirety. |
 |
| Paper piecing of the geese entrails in progress |
 |
| Detail of the geese entrails, show just a few more to go. |
I have recently joined Art Quilter's Bi-monthly Challenge, hosted by Carol McDowell. It is very much like my 9th grade class, only instead of writing, the assignment is to make an art quilt based on a prompt. The January/February prompt is to make a quilt inspired by pg. 20 from a magazine - any magazine, so long as it isn't about quilts. Since I don't subscribe to magazines, I turned to my library's online collection. Right near the top of the screen, since the magazines are alphabetical order by title, was Audubon. Pay dirt! Page 20 was perfect.
I could have chosen any word, the sky, the geese, the color palette or even reflections. What I opted for was the title, Finding True North and the geese as my catalyst. The figurative definition of True north is what guides you in your life. When it comes to making art quilts, my true north, or what I return to time and time again, are traditional blocks pushed a bit beyond traditional. I also enjoy insider hints based on the block's name. No surprise my piece features several flying geese entrails. Gradating my work from light to dark, is something else I enjoy. Therefore, my geese go from brilliant yellow to the palest of cream yellows. Finally, I will be leaving plenty of open sky, so that when it comes time for free motion quilting, I can go town.
I am linking up with Nina Marie's Off the Wall Fridays.
Friday, January 25, 2019
Week in Review 2019 - 01/25
What a difference 30 years makes! I began quilting in September 1985, so actually it has been 33 years. My first foray into quilting was to take a class based on Quilt in A Day: Log Cabin Pattern by Eleanor Burns. Everything was new to me, from how to select fabrics based on value to the importance of maintaining a 1/4" seam. I knew nothing about art quilting. I'm not even sure the term was in existence, although there were a few pioneers doing their own thing.
 |
| My Neighbor's Shed Background All fabrics come from my stash of hand painted fabrics |
Steps taken to create My Neighbor's Shed:
 |
| My Neighbor's Shed Thread painting in progress. Two of the elements are done, the third is outlined on Solvy and ready to be painted. |
2) I imported the image into EQ8 and traced the primary lines to create a blue print to follow.
3) I broke down the shed so it could be paper pieced.
4) I sized the original photograph so I could trace some of the trees and bushes for thread painting.
5) I pieced the shed and backed it with Heat 'N Bond so that it could be fused to the quilt.
 |
| My Neighbor's Shed Nearly done |
6) I created freezer paper templates for the background.
7) I ironed the templates to fabric, trimmed to an approximate 1/4" seam around the templates, then pieced the background.
8) In order to create the bushes and trees, I traced the shape and key color changes onto Solvy, a water soluble glue film.
9) I made a thread painting sandwich by layering to two pieces of tulle between the Solvy sheet with the tracing and a blank Solvy sheet. This provides stability for thread painting. If it is done directly on the quilt, there will be puckering and shrinkage. Instead the individual elements are thread painted off quilt, cut away, and rinsed in warm water to dissolve the Solvy.
 |
| My Neighbor's Shed How it will look in the mat board frame. |
10) Create a quilt sandwich of the background, batting and a background, and quilt it BEFORE the foreground is added. Why before? If one waits until after, then the quilting process is more complex. It is the difference between mowing a wide open lawn and one with boulders and trees.
11) Now it is time to arrange the shed and greenery to the quilt. The thread painted elements are attached with the addition of a little, emphasis on little, more thread painting.
12) This is my Spotlight Auction submission. The size is mandated at 4.5" x 6.5" viewing area, but must measure 6" x 8". The recommended finish for the edge is a zig zag stitch. Other than the paperwork and label, it is done!
I am linking up with Nina Marie's Off the Wall Fridays.
Friday, January 18, 2019
Week in Review 2019 - 1/18
 |
| Mid Tide 12" x 12" |
Isn't it great to finish a project? Much as I love delving into something new, I relish its bookend, completion. There is something very satisfying about setting out to do something and accomplishing it.
 |
| Mid Tide detail |
I am so grateful I chose to focus my year on making 12 12" x 12" artworks. It is manageable, comfortable, and I feel zero pressure. I've basically finished my first one. So, now I have 11 12" x 12"s to go.
I am linking up with Nina Marie's Off the Wall Fridays.
Friday, January 11, 2019
Week in Review 2019 - 1/11
 |
| Quick reference photo for my first 12" x 12". Our home overlooks this view. I've been obsessed with the roof line of the shed ever since we moved in. |
I don't make New Year's resolutions. I do choose something to focus on each year. In the past I've undertaking various weekly art exploration classes such as mixed media or how to draw. One year I committed to doing something new each week. Another year I made sure to extend an unexpected kindness. This year, I'm back to focusing on art. I have decided to make a different 12" x 12" fiber art piece each month.
 |
| Piecing planned designed on EQ 8 |
 |
| Current state of Mid Tide |
 |
| Cohasset Sunrise is squared up ready for binding |
I normally work on mid-size to large pieces. It is the scale I am most comfortable with. So, focusing on something small forces me out of my comfort zone. It also has the advantage of being the required size for two different SAQA projects I plan on contributing to. The first is Massachusetts/Rhode Island's regional trunk show. The trunk show will tour libraries, guilds and other venues found for it. It is a great way to introduce people to the variety of work being produced by local art quilters. The second is SAQA's annual benefit auction. This is one of the ways SAQA fills the gap between membership dues and annual expenses.
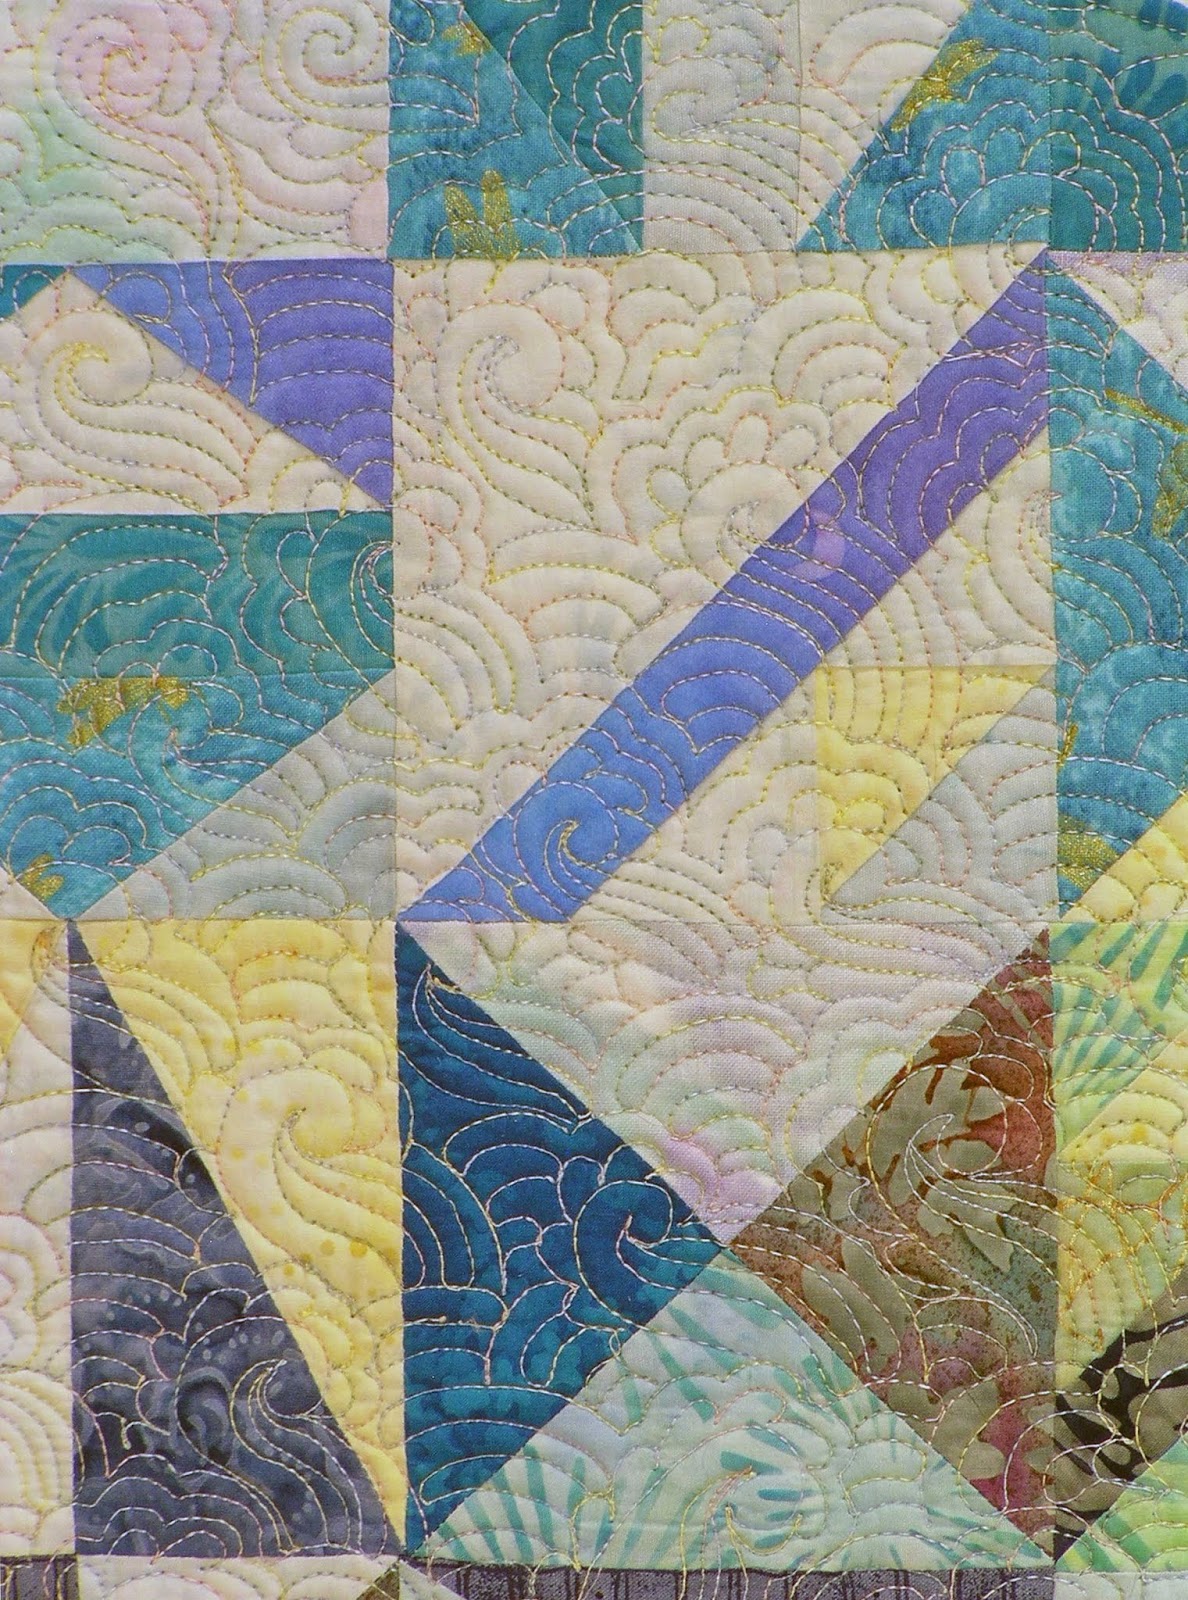 |
| Detail of the free motion quilting of waves in the lower section of Cohasset Sunrise |
I spent the last month of 2018 obsessively free motion quilting Cohasset Sunrise. It is squared up, 84" H x 59" W, and ready to bound. It has been a long time since I have had the excuse to do some hand sewing. A question I have been asked from time to time, is what is my favorite phase of making a quilt. The truth is I enjoy all aspects. Hand sewing is one of those rare moments in life when one can sit back and let the mind wonder. There aren't enough times carved out for reflection in a day. No wonder slow stitching and knitting have been gaining in popularity. Such peaceful pursuits.
The weather may be turning colder, but I have the good fortune to be able to hunker down in my studio and create.
I am linking up with Nina Marie's Off the Wall Fridays.
Subscribe to:
Posts (Atom)