Showing posts with label quilt as you go. Show all posts

Friday, July 24, 2015

Week in Review 2015 - 07/24


Tips, Thoughts and Techniques:

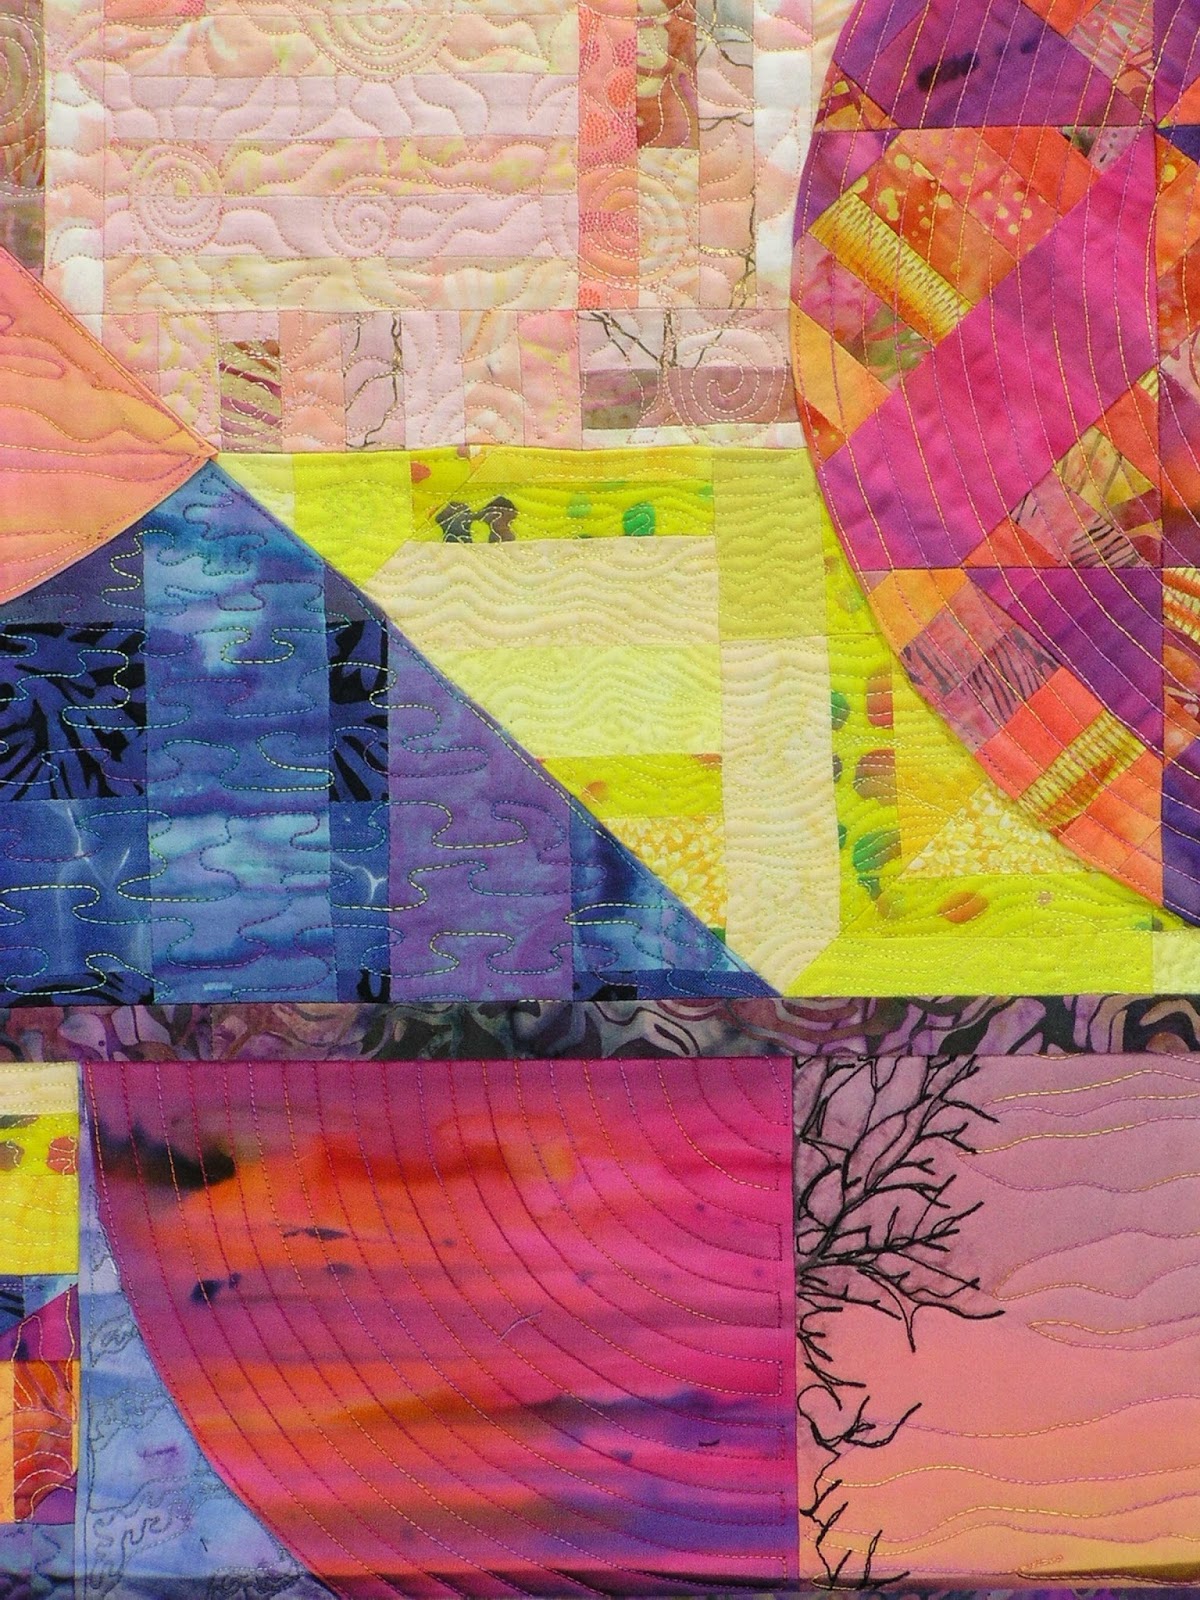
Usually I judiciously crop my images so that you can't
see loose threads trailing down or the pins securing
the quilt to the styrofoam wall. Today, I opted
to show Deconstructed Sunrise as it really looked,
when I stopped working yesterday. The binding is
attached, but not turned to the backside.
Sometimes I surprise myself. I've been doing that quite a bit this week in several aspects of my life. Those of you who follow my blog (thank you, thank you!) know that this is the third year that I am participating in the National Bike Challenge. What I love about this is that the vast majority of participants are like me, amateurs eager to find a way to push themselves just a little bit further. The only goal, if it can be called that, is to get out and ride regularly. The way the NBC works is that you get 20 points for each day you ride plus one point for each mile you ride. So if you ride 10 miles your total points for that day are 30. There are five possible virtual badges given out to each rider depending how many points you earn during the five month challenge. The past few years I have reached the first four badges, but never been in the running for the ultimate, final badge. That badge is Diamond, requiring a grand total of 5,000 points. At the rate I've been pedaling I will definitely reach Diamond. This seemed such a lofty, impossible goal when I started. Now I wonder why I sold myself short.
Much of this week's studio time was
spent on FMQ the last couple of
Deconstructed Sunrise panels and
then attaching the panels to each other.

I know I have the reputation of being well organized and a hard worker. Is this deserved? Yes, and no. What you see is what I choose to share. The writing of a weekly blog encourages me to come to some point in the process that "shows" as an accomplishment and photographs well. I surprised myself this week by stopping at good point for me, but less than pretty point for the blog.

I have also been pleasantly surprised by my growing infatuation with Deconstructed Sunrise. This is absolutely a method, palette and concept I feel a need to revisit time and time again.

All these surprises and a few more have resulted in the longest my studio has gone without having my fabric shelved and the remaining detritus stored or trashed. For someone who thrives on clear surfaces and well organized drawers and closets, it is good to know that sometimes, just sometimes I can let go.

Surprise, surprise I even accomplished things this week. Here is how it went:

My studio as it looked Thursday night. Note that the
work table and George's table are becoming covered
with all I "need" and some things no longer needed.
Yes, my studio is huge. I am very fortunate to have the space. 
1) Finish quilting Deconstructed Sunrise - Due November 30, 2015) - Done!

2) Start the finishing work on Deconstructed Sunrise - Done!

3) Free motion quilting practice. - Done!

4) Post the number of days I have worked in my studio in 2015 - 55.5/126

5) Perform a random act of kindness - Done!

What surprises will I have in store for myself next week? They wouldn't be surprises if I knew. No surprise, I do have a plan. Here it is:

1) Continue the finishing work on Deconstructed Sunrise

2) Free motion quilting practice. 

3) Post the number of days I have worked in my studio in 2015

4) Perform a random act of kindness 

I am now linking up to two blogs on Fridays. The first is Nina Marie's Off the Wall Fridays and the second is Free Motion Mavericks.

Sunday, October 14, 2012

UFO's of a Different Nature

Ever wonder what to do with class samples? When I first started quilting back in the Jurassic period (1985) I signed up for workshops, lots and lots of workshops. They were a great way of picking up techniques and getting tips. They were also a great way of accumulating half finished projects and samples. Now I rarely sign up for a workshop, but I did commit to doing the assignments given by Leah Day on her blog, The Free Motion Quilting Project. I've done all 35 to date. My stash of samples was mushrooming. What to do?

The answer came when Fiber Artists Coalition decided to create an exhibition titled Salvage and Selvage. All the work in the exhibition had to include recycled materials. Why not repurpose my free motioning quilting practice pieces, using the quilt as you go method and repurpose those samples? Hence Tree Serenade was created.

Tree Serenade
48" H x 40" W
If you have been following my blog you will recognize various pieces of the quilt, such as my "wonky" quilt, several pivoting paisley incarnations, a few branching out pieces, my sample of adding acrylic paint mixed with a bonding medium and the latest assignment based on flowing lines that became the tree. If you haven't followed the blog or just want to jog your memory, scroll through the previous posts and have fun matching them to the background pieces. Note how the quilt as you go method becomes an integral part of the design.

The only portion of the quilt that did not come from Leah's assignments are the leaf clusters. These were made by spray painting dryer sheets, bonding them to drop clothes used to catch paint in my wet studio, cutting out clusters, fusing them to quilt and further securing them with free motion quilting.

Detail from Tree Serenade
Note the leaf clusters made from painted dryer sheets.


Saturday, February 18, 2012

Machine Quilting With Leah Day - Week 7

When I first started quilting in the late 1980's the Quilt As You Go method was very popular. I first learned about it from watching Georgia Bonesteel on a PBS TV program. Despite my curiosity about it and even its practicality I never gave it a try.

The point behind QAYG is two fold. When most of piecing and quilting was done by hand quilting was very portable. This method allowed you to bring your quilting with you where ever you went and when you had a spare moment piece or quilt a portable section of a quilt, usually a block. It was often used in friendship quilts when friends would make blocks for each other's quilts. This way a friend received not just a pieced block, but the block was already quilted. Today more and more quilts are being almost completely executed by machine. However, when it comes to quilting on a domestic machine large quilts are difficult maneuver, especially during the quilting phase since there is insufficient space between the needle on the left and the motor section of the machine on the right. By breaking down the quilt into smaller sections maneuverability is no longer a space issue.

QAYG works by butting up already quilted sections of quilt and hiding the juncture with a strip of fabric on both the front and back side.


Front


Back

Using samples made during earlier weeks, I created a table runner shape. On the front side I covered the junctures with a rose colored fabric. I chose a delicate floral design fabric for the back of the quilt. Note how the channels become a design element. That is one of the reasons I have never tried QAYG. My quilts are non traditional art quilts that don't lend themselves to vertical and horizontal strips. 


Front Channels

I was very, make that VERY pleasantly surprised by how flat and smooth the channels in the front came out. I am a persnickety quilter and these passed with flying colors.


Back Channel

After the primary work is done attaching the two quilt segments with channels front and back you are left with one side of the back channel to sew down either by machine or hand. I couldn't bring myself to sew it by machine. I am just too fussy and machine stitches would show on the front. I opted to sew the left side of the channel by hand. If you click on the image labeled Back Channel you should be able to see my hand stitches. It did occur to me that a Crazy Quilt, where decorative stitches are an integral element of the quilt, would be well suited to having the channels sewn by machine using a decorative stitch. 

I would change one aspect of Leah's directions. She has you cut the back channel strip 1.5" wide and fold it in half, creating a 0.75" wide strip. Folds, no matter how crisply pressed always take up a thread or two. Therefore, the 0.75" is more like 0.70" and falls slightly short of the machine stitch line it should be hiding. I would prefer to make my strip lightly oversized for the back and cut it 1.75" wide instead, thus guaranteeing coverage.